
Installing the Firmware
Contents
There are two critical files in this project:
| File | Description | Address |
|---|---|---|
| firmware.bin | The Brew Bubbles application layer | 0x00000 |
| littlefs.bin | The Brew Bubbles web file system | 0x300000 |
These files represent the program that you upload to your controller. The firmware.bin file is the C-based program that handles serving web pages, processing configurations, detecting pulses (bubbles), scheduling, and monitoring the temperature. The littlefs.bin file is how the controller’s web file system is delivered. It is analogous to a directory on your computer. It contains web pages and images served via the web interface.
Flashing Firmware - Initial
Flashing the firmware may be done from many platforms with a variety of tools. The following are some methods that have I have tested. Other methods may work; however, I have no experience with them.
- Important Note:
- The ESP8266 has a memory section which is not erased or written over by flashing firmware. If you have previously used your controller for any other tasks, I recommend that you wipe the flash memory before you begin. The method to do that differs by the tool used, and more information follows in the sections below.
Before proceeding, connect your controller via the USB port to your workstation.
Preferred Method for Windows and Macs
BrewFlasher is a stand-alone desktop application for Windows and macOS designed to simplify flashing Brew Bubbles (And other brewing-related firmware) to your controller.
It handles everything - locating the correct firmware, downloading it, setting the correct flash options/offsets, and flashing the firmware. There is no fumbling with the command line or worrying about esptool options. Select the project you want to flash, click a button, and you have finished.
You may download BrewFlasher from its GitHub release page or BrewFlasher.com.
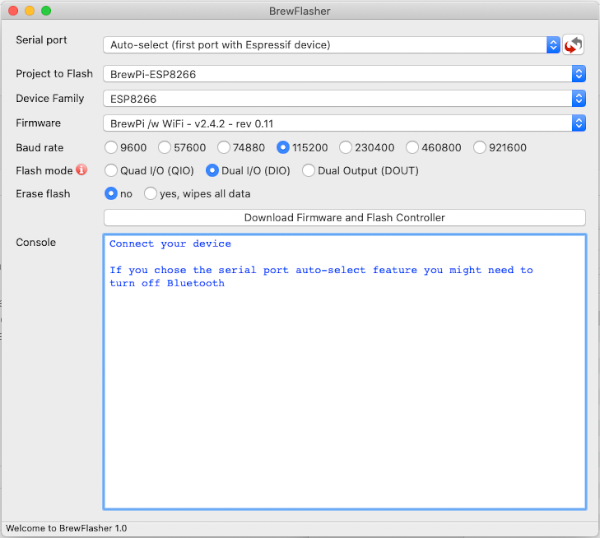
You will use the following settings:
- Serial port: Auto-select
- Project: Brew Bubbles
- Device Family: ESP8266
- Firmware: Brew Bubbles (latest version)
- Baud rate: 921600 (any should work, this is faster)
- Flash mode: Dual I/O (DIO)
- Erase flash: yes, wipes all data (this avoids problems later on - it will wipe wifi settings if any)
Now click the button that says, “Download Firmware and Flash Controller.”
Here is a short video produced by the author of BrewFlasher.
Unix-Based Platforms (or Windows with Python)
Espressif, the makers of the ESP8266, have adopted a python-based tool named esptool. Assuming you have either Python 2.7 or 3.4+ on your system, you can install esptool with pip:
pip install esptool
Note: With some Python installations, you may receive an error. Try python -m pip install esptool or pip2 install esptool (the latter, especially if you are on Python3).
After installing, esptool.py is available in the default Python executables directory. For manual installation instructions, please visit the GitHub repository.
Once esptool is installed, you may use the following command line to flash the firmware (assuming the firmware is in the local directory):
esptool write_flash 0x00000 firmware.bin 0x300000 littlefs.bin
Please note that this takes advantage of esptool’s capability to auto-detect the controller attached via USB. If you have other devices directly attached to your system, this may fail, and you will need to specify the port manually. For example: -p /dev/ttyUSB0 (or -p COM3 on Windows.)
If you desire to erase your controller, you may also use esptool’s erase flash option:
esptool erase_flash
Mac Platforms
I do not have access to a Mac. However, anecdotally, I believe Mac users may follow the “Unix-Based Platforms” instructions above. If you have firsthand knowledge of this process, please let me know.
Windows-Based Platforms
There are two methods for uploading the firmware files to your controller. The preferred method is BrewFlasher; the controller vendor supplies another available way:
Espressif Tools
Espressif’s Flash Download tool is the tool that the makers of the ESP8266 have released. Download it directly from Espressif’s website. Unzip the tool to a convenient folder and execute the application (named flash_download_tools_v3.6.7.exe at the time of writing.)
Here you see the console window and the main screen:
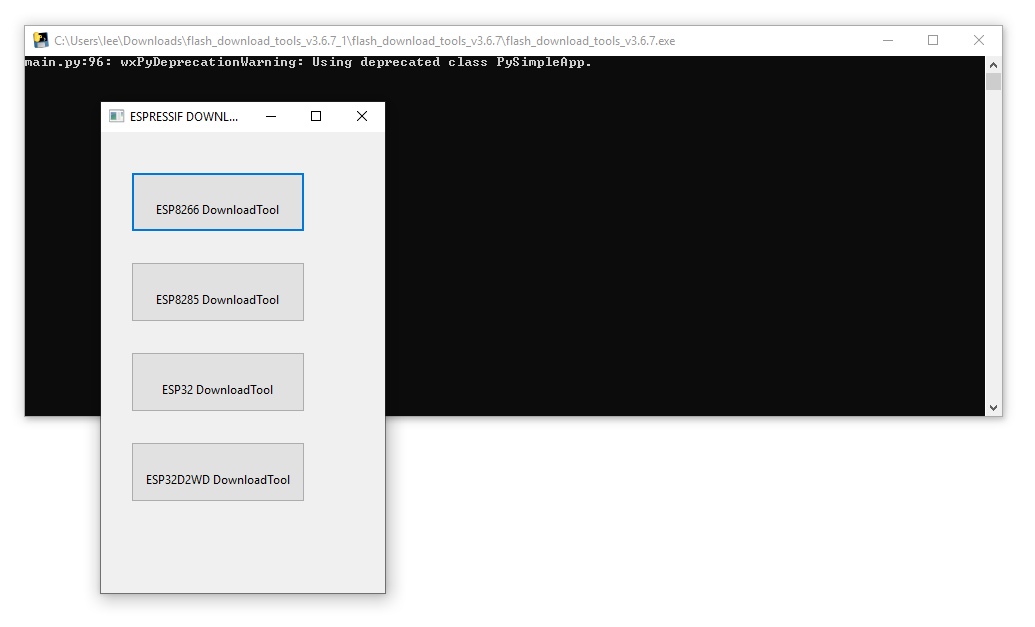
Select “ESP8266 DownloadTool.” Setup as follows:
- Add the firmware file - Check the first checkbox - Click the ellipsis (…) next to the text field - Navigate to the firmware directory, select firmware.bin and click “Open” - In the right-most text field after the “@” symbol, enter the address 0x00000 (zero, the lower-case letter “X”, followed by five zeros)
- Add the SPIFFS (LittleFS) file - Check the second checkbox - Click the ellipsis (…) next to the text field - Navigate to the firmware directory, select littlefs.bin and click “Open” - In the right-most text field after the “@”* symbol, enter the address 0x300000 (zero, the lower-case letter “X”, followed by the number “3” and five zeros)
- Set the CrystalFreq to 26M
- Set the SPI Speed to 40MHz
- Set the SPI MODE to QIO (you may use DIO if you experience issues flashing the firmware)
- Set the FLASH SIZE to 32Mbit-C1 (32 Megabits = 4 Megabytes)
- Select the proper COM port
- Set BAUD to 460800 (you may use a lower speed if you experience issues flashing the firmware)
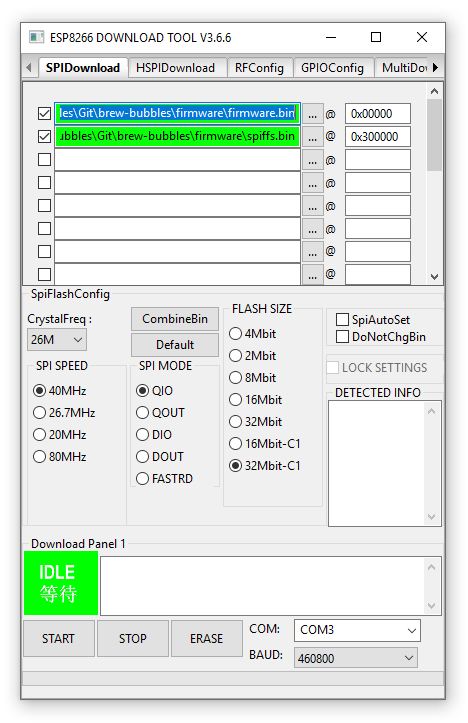
When setup is complete, click on the “START” button underneath the green box. The darker green box will move across the bottom of the window, and when complete, the bright green box changes to “FINISH”.
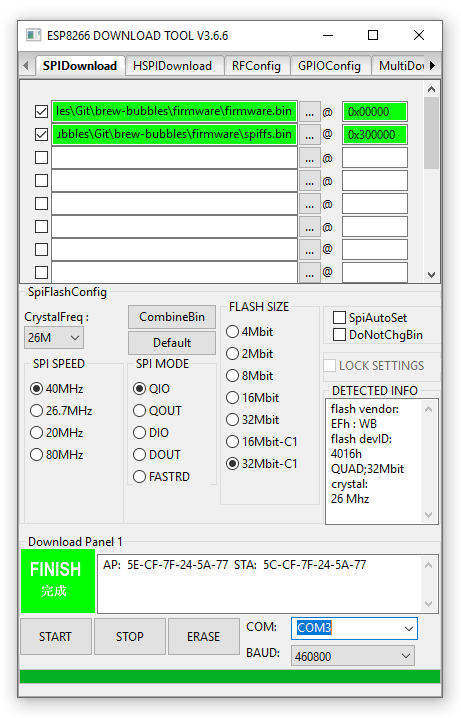
At this point, you may close the tool and the selection screen and proceed with setup.
Erase Flash
If you desire to erase your controller, you may leverage the “ERASE” button within the Flash Download tool.
Firmware Updates
The web application provides Over The Air (OTA) update functionality for upgrades. Navigate to the Settings page and scroll down to the Update Firmware section.