
Operation and Configuration
Brew Bubbles is presented to the user for monitoring and configuration as a set of web pages. Below are the different information and settings available.
Contents
mDNS Support for Client OS
The Brew Bubbles device leverages a multicast Domain Naming System (mDNS) to make it easier to connect to your device. You may also have heard of zeroconf, which includes mDNS; or Avahi, which is a different implementation of mDNS. For our purposes, all of them work together.
Since I designed Brew Bubbles to be accessed and configured via a web page, you need to know its address. Your local WiFi automatically assigns an IP address if you did not enter a static address in the WiFi configuration. You can always type in something like 192.168.4.100, but that’s not as easy to remember as brewbubbles.local.
macOS and Linux (including Raspberry Pi’s) have implementations of mDNS, which will natively allow them to use the *.local name. Windows requires that you install a small program to support mDNS. Review the table below for OS support of mDNS:
| Operating System | mDNS Support |
|---|---|
| MacOS | Built-in |
| iOS | Built-in |
| Linux | Built-in most versions; If not, install Avahi |
| Android | Not natively supported. No Android avail for testing. |
| Windows | Not natively supported. Install Bonjour from Apple |
You can undoubtedly work with Brew Bubbles without mDNS. However, it makes your life easier. If you do not implement mDNS, of course, you either need to use an OS hosts file or bookmark (or remember) the IP address.
You may access Brew Bubbles by entering the name brewbubbles.local (or the IP address) in your browser.
If you have an issue accessing a *.local address, it may be that your router does not support multicasting. Very old routers and some routers which are supplied by your cable company may be in this category. If this is the case, you need to use the IP address.
Menu
Across the top of every page, a menu displays. The standard desktop page looks like the below:

The mobile header looks like the below:

Clicking on the three vertically stacked lines, called a “triple bar,” activates the main menu:
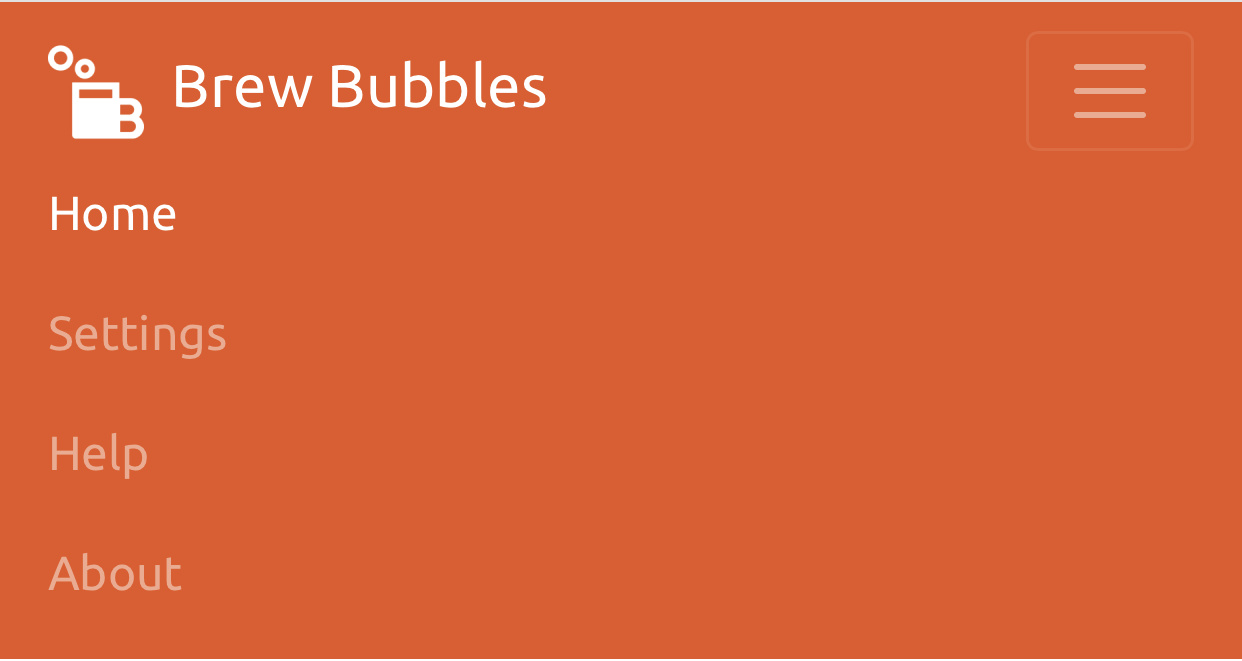
The page layout is responsive; the web browser’s display ratio determines the header type. If you change your browser window layout to be more narrow on your desktop, it displays the mobile header.
Either across the top in desktop mode or as a dropdown when you click the ≡ character, you see the following choices:
- Home
- The main page, with the current values displayed.
- Settings
- Configuration and maintenance choices.
- Help
- Where to get help.
- About
- Information about the author.
You may review each of these below.
Home Page
Accessing the main page of Brew Bubbles provides you with ready access to all functional monitoring points:
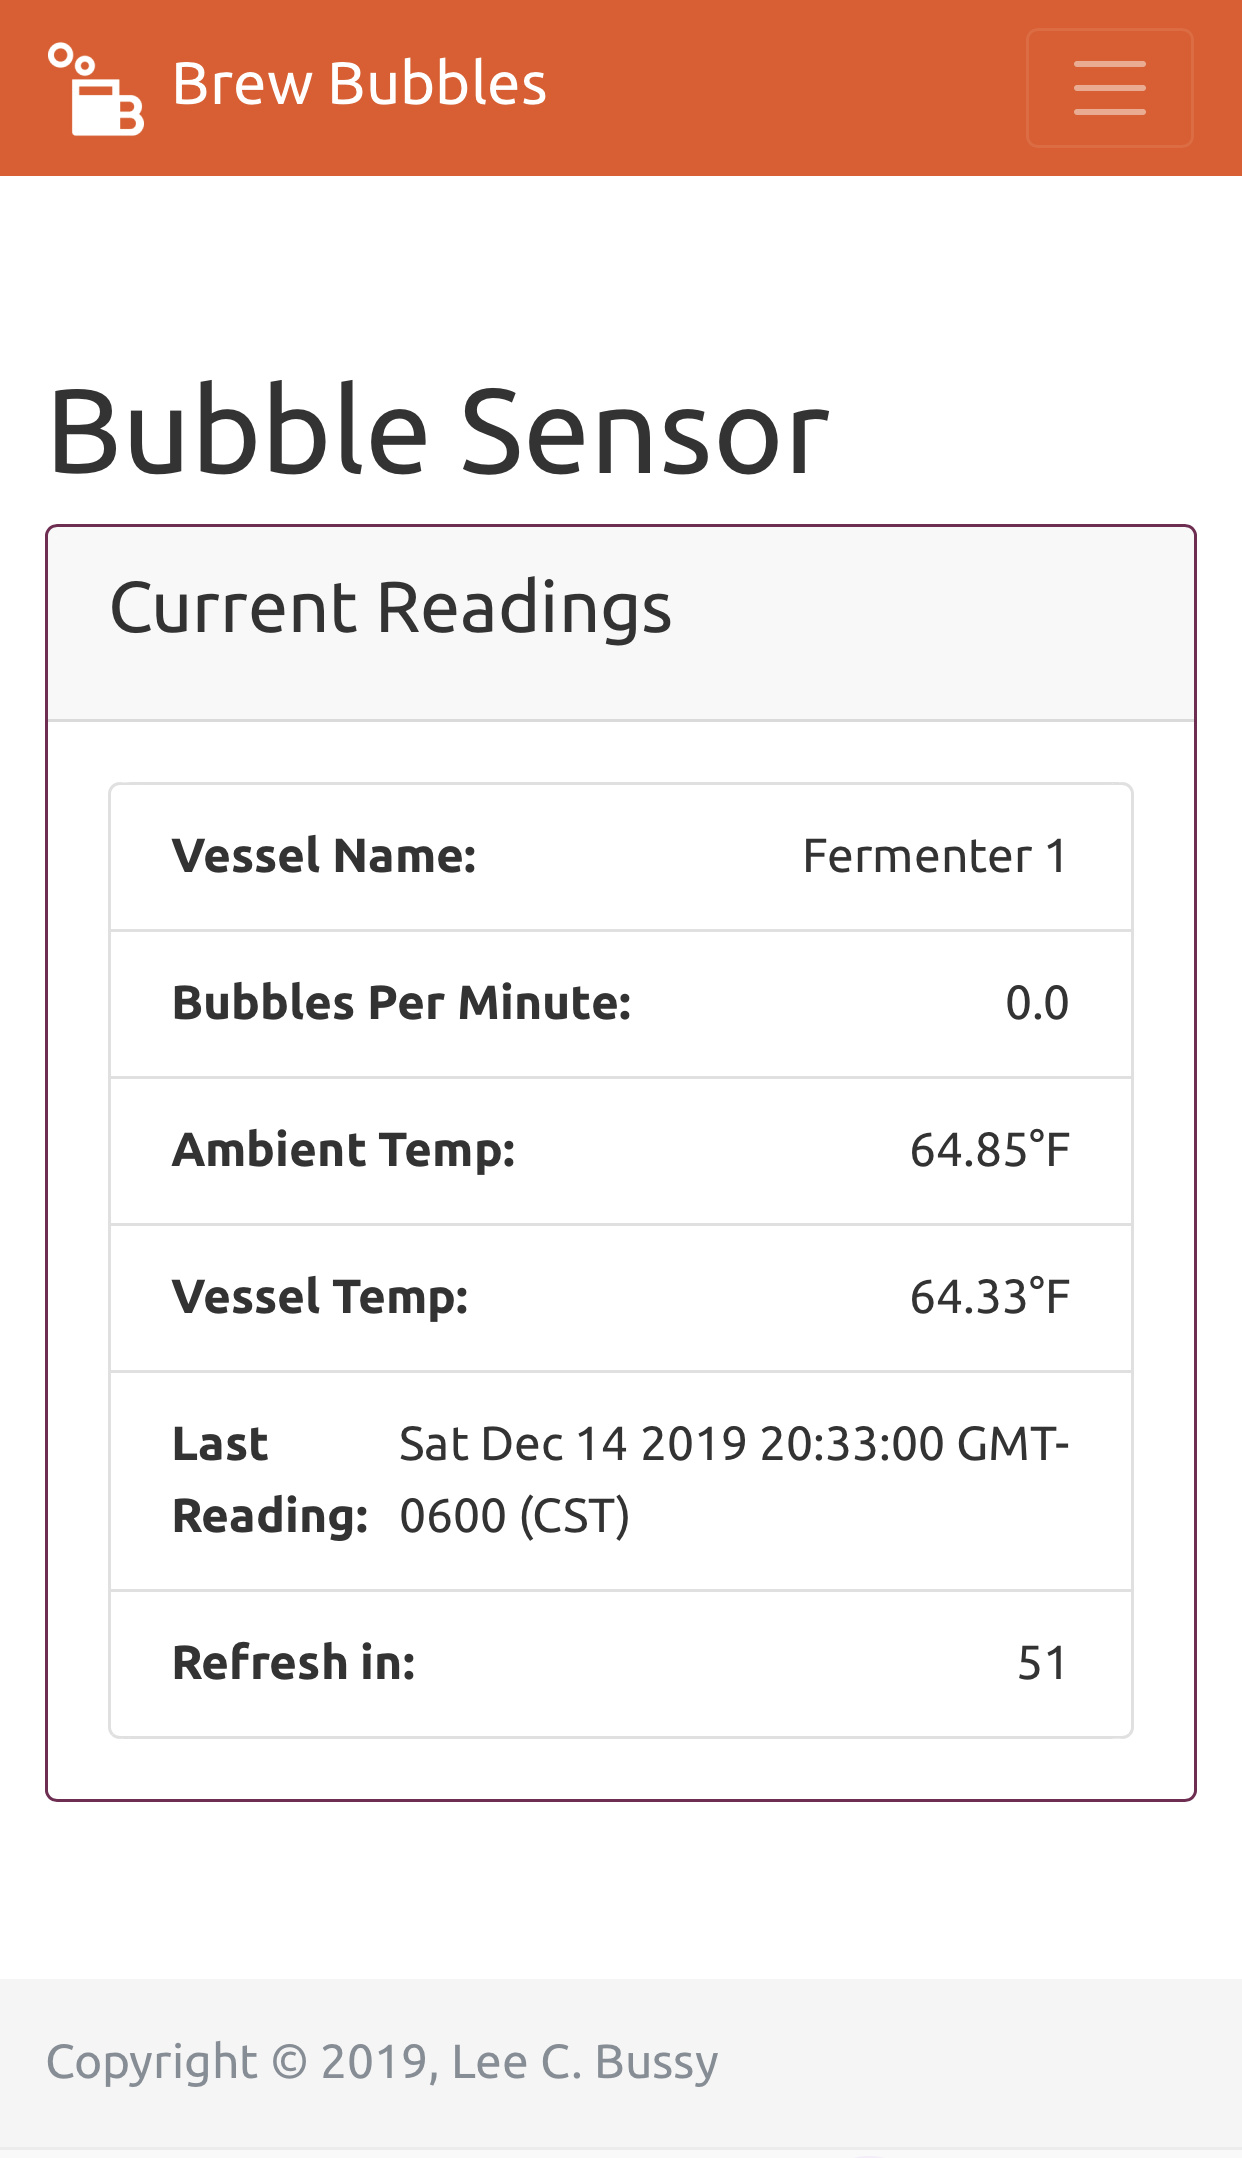
You will see the following items:
- Vessel Name
- Vessel Name is a label that you may assign to help you keep track of multiple devices. It defaults to “Fermenter 1,” but you may change it in the settings.
- Bubbles per Minute
- Brew Bubbles internally polls the device for approximately one minute. It then reports the bubbles per minute in exact terms, meaning the number may be a decimal. Brew Bubbles also uses a sliding window to average the readings to help filter noise. The sliding window is set at 15, meaning as the device is in operation, it reports Bubbles per Minute as an average of up to the last 15 readings. In effect, this is a 15-minute moving average. This window is not configurable via the interface.
- Ambient Temp
- If you have an ambient (room) temperature sensor installed, this reports the temperature in the configured temperature format (default is Fahrenheit.) This temperature reports in a 5-minute sliding window. This window is not configurable via the interface.
- Vessel Temp
- If you have a vessel temperature sensor installed, this reports the temperature in the configured temperature format (default is Fahrenheit.) This temperature reports in a 5-minute sliding window. This window is not configurable via the interface.
- Last Reading
- The date and time of the most recently calculated reading set within the controller. Internally the device refreshes its values approximately every 60 seconds.)
- Refresh In
- The web page refreshes its displayed values every 60 seconds. This field shows the time remaining until that refresh.
Settings Page
The settings page contains all configurable items for configuration and control of Brew Bubbles.
- Note:
- Each setting page as an “Update” button. Be sure to save any updates before leaving a page. There will be no reminder if you selct another link without saving.
Controller Settings
The first settings frame is the Controller Settings. This section deals with the overall device configuration.
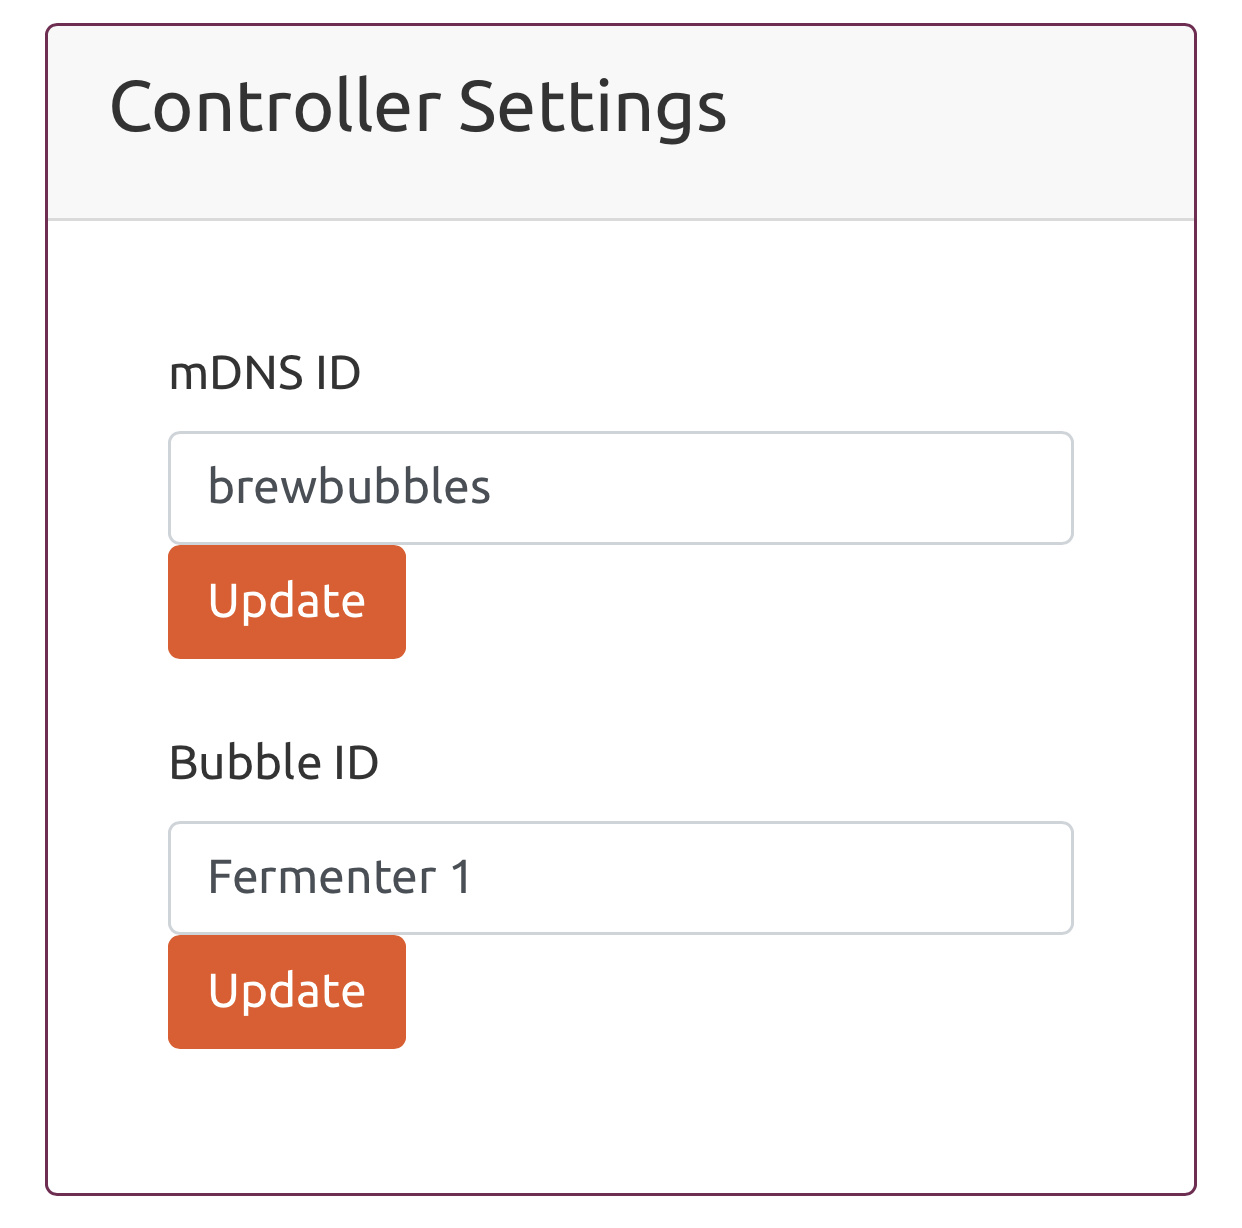
You may configure two items here:
- mDNS ID:
The default mDNS name for Brew Bubbles is brewbubbles. This name forms the name portion of the mDNS name brewbubbles.local. The mDNS name needs to be unique on the local network. If you have more than one Brew Bubbles device, you should change these names to be unique. Should you forget and have two with the same name, you must access the controller via the IP address to change the name.
The name should be 3 to 24 characters in length, begin with a letter, and contain only ASCII letters ‘a’ through ‘z’ (case-insensitive), the digits ‘0’ through ‘9’, and the hyphen-minus character (‘-‘). Do not include the .local portion of the mDNS name.
- Bubble ID:
- Bubble ID is an additional field that can help distinguish between different Brew Bubbles devices reporting to a shared system.
Temperature Settings
Configure temperature format and calibration in this section:
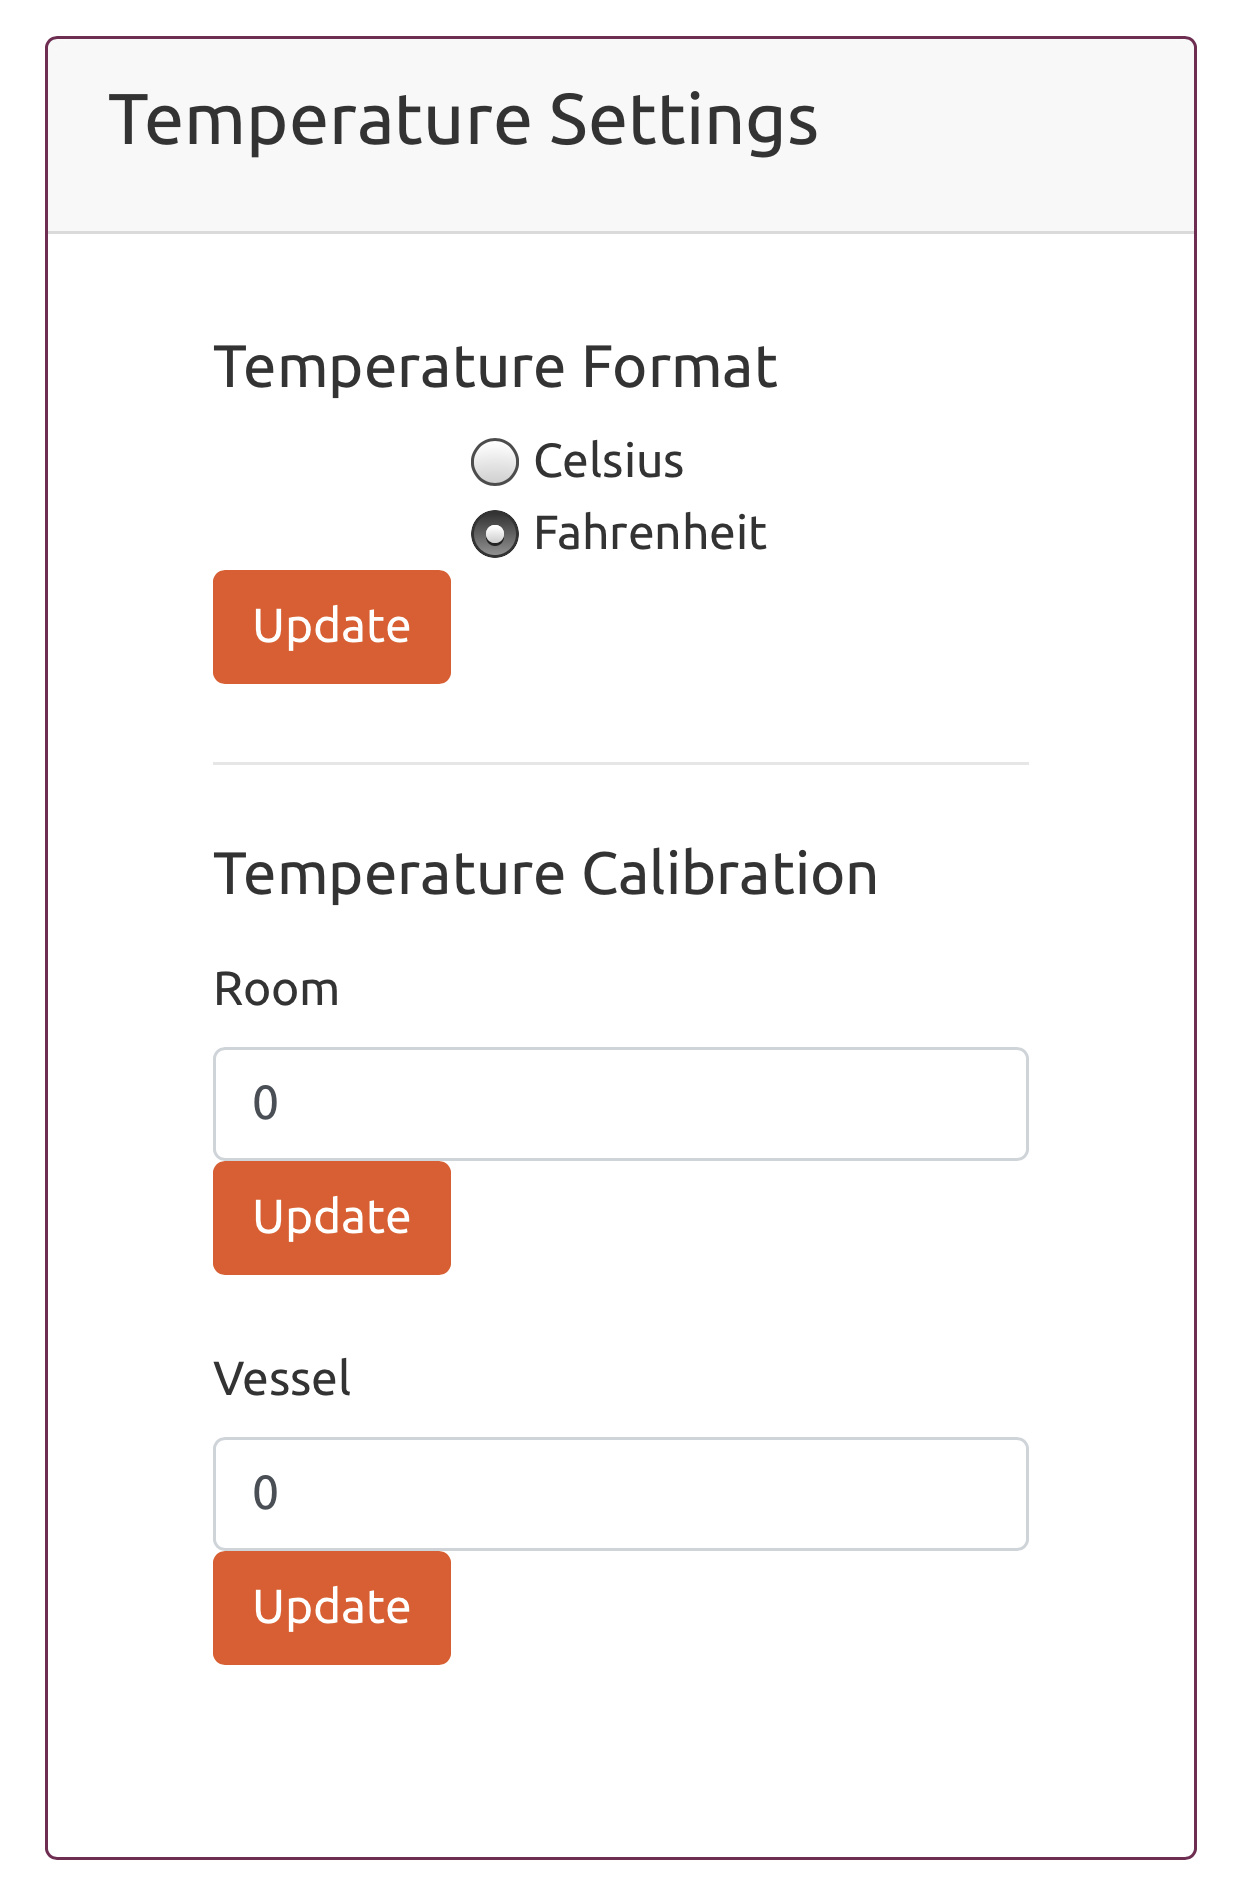
- Temperature Format:
- Select either Fahrenheit or Celsius with the radio button. Conversion happens internal to the controller and reports in the proper format.
- Temperature Calibration:
- In this section, you may enter calibration offsets to either sensor independently. Enter any decimal-based number from -25.0 to 25.0 and click “Update.” The compensation applies internally, and the corrected temperatures are displayed.
URL Target Settings
Target settings control how Brew Bubbles reports to HTML endpoints such as BrewPi Remix or Fermentrack. BrewPi Remix automatically begins to report on Brew Bubbles’ data once received at its endpoint.
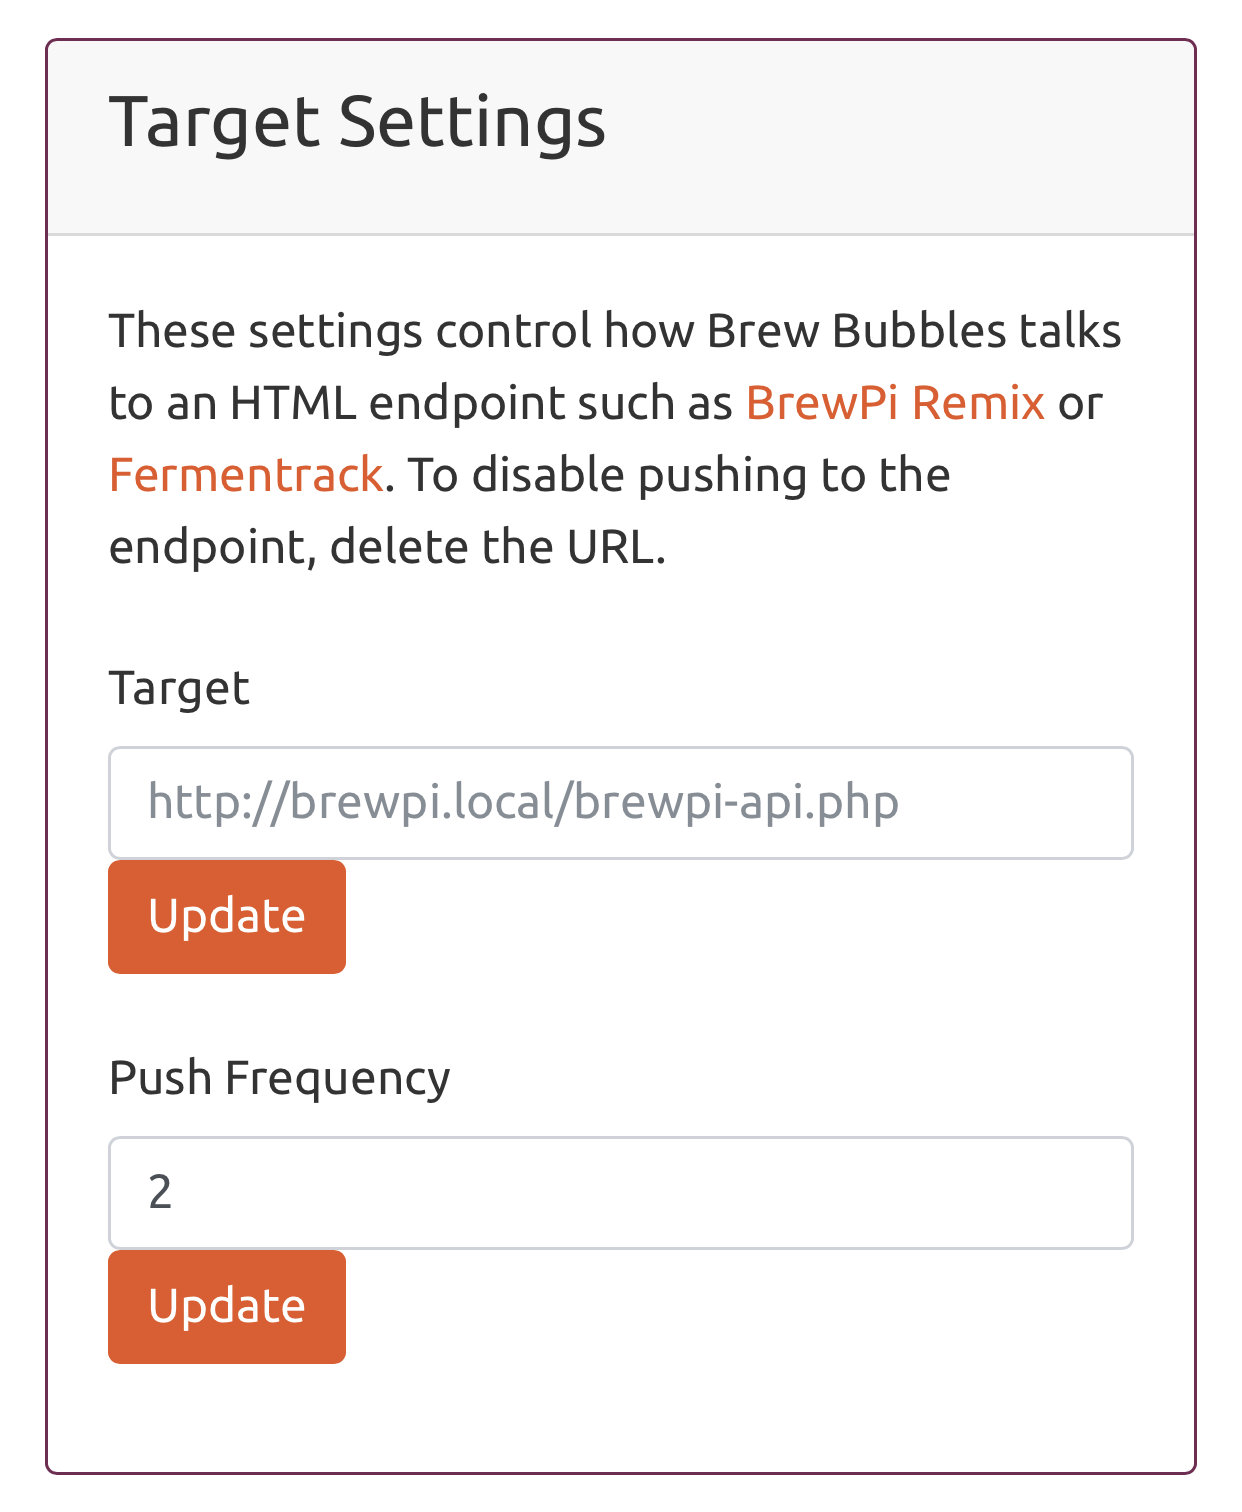
- Target:
The target may be any DNS or mDNS name. If you are using mDNS, be sure to include the “.local” portion. The address should be a complete URI, including the target page and port if needed. For BrewPi Remix, the name will be http://{hostname}.local/brewpi-api.php.
If you are unable to access Brew Bubbles using the *.local name, you are not able to use a target with a .local name either. In this case, use the IP address of your target.
Only HTTP (not HTTPS) is supported. Support for SSL on controllers is extremely resource-intensive as well as unstable at this time. If the libraries improve in the future, I will consider https support.
If a port number is required, it comes immediately after the hostname. Basic URI rules are:
http:[//authority]/path[?query][#fragment]
Authority is made up of:
authority = [userinfo@]host[:port]
For more information, please review the Wikipedia article.
- Push Frequency:
- Enter the push frequency in minutes. Be sure to check your target system’s requirements and restrictions so that you do not flood the target. For BrewPi Remix, I recommend setting it at 2 minutes, which matches the default charting granularity. Valid settings for this field are 1 to 60 minutes.
Brewer’s Friend Settings
The friendly folks at Brewer’s Friend have added “BPM” (Bubbles per Minute) to their API. Adding Brew Bubbles to your Fermentation Chart is done on the Fermentation Chart page for your brew under “Devices.” Select “Link Devices,” choose a “Stream” device, and select your Bubble ID. The device must have reported to Brewer’s Friend at least once to be listed.
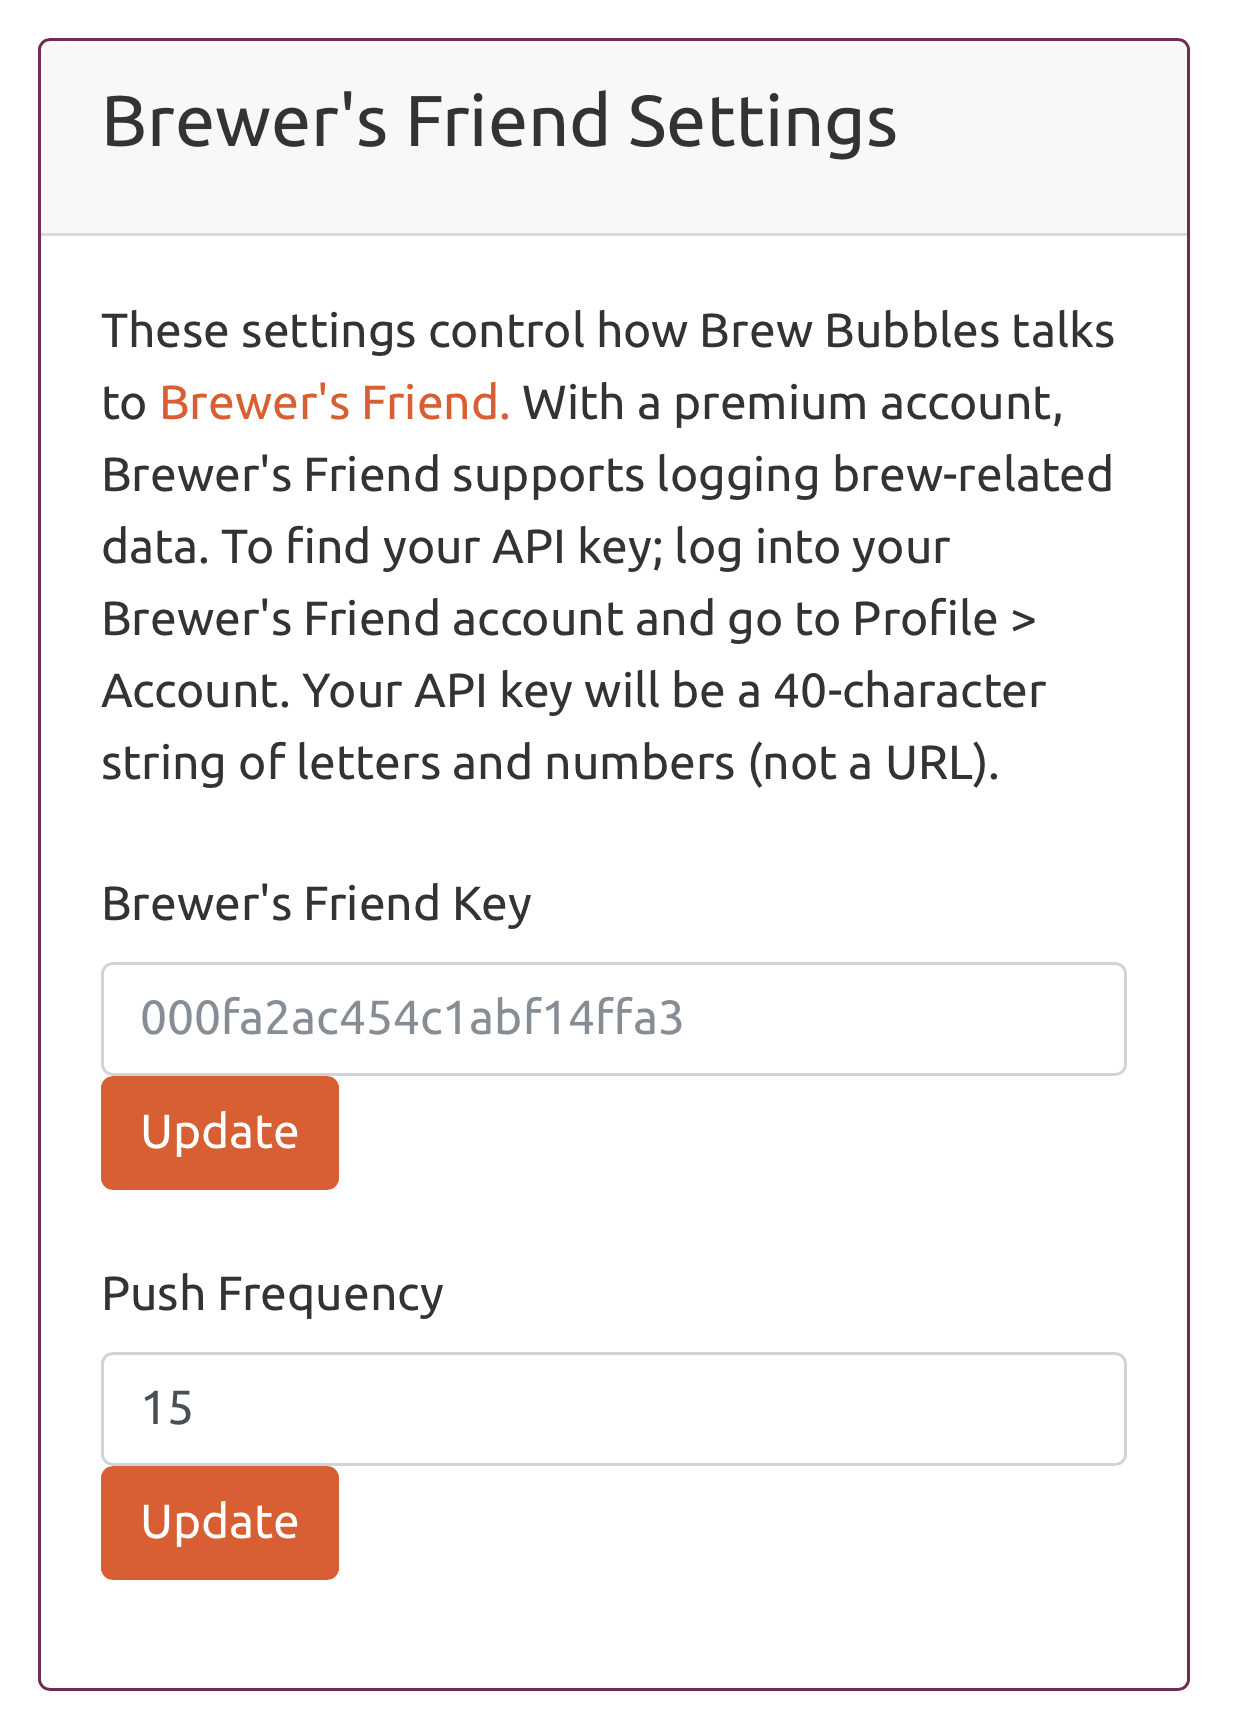
- Brewer’s Friend Key:
- Find your API key from your Profile dropdown in the top-right corner of the web page under “Integrations.” Towards the top of the page is a section labeled “API Key.” Copy the API Key and enter it into this section and click “Update.” The key is a long hexadecimal key which will look like c6e88f70f575c4ecdca3dcb686381185.
- Push Frequency:
- Enter the push frequency in minutes. Brewer’s Friend requires that you push readings no more than once every 15 minutes. Valid settings for this field are 15 to 120 minutes.
Brewfather Settings
Brewfather integration is also supported. Adding Brew Bubbles to your Fermentation Chart is done in Settings where you will enable “Custom Stream.” The device must have reported to Brewer’s Friend at least once to be listed.
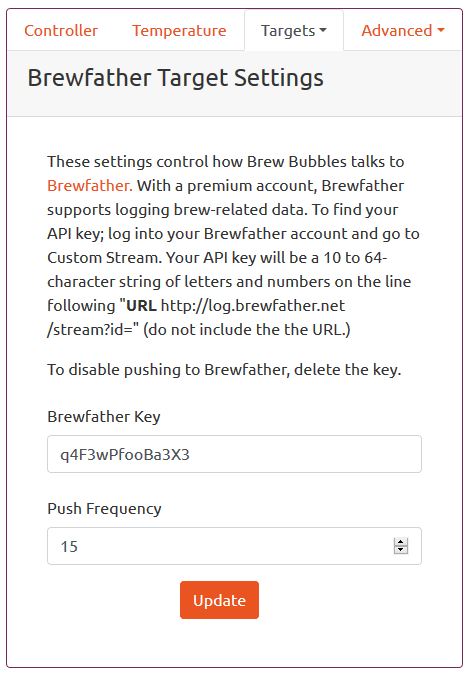
- Brewfather Key:
- Log into your Brewfather account and go to Settings > Custom Stream. Your API key will be a 10 to 64-character string of letters and numbers on the line following “URL http://log.brewfather.net/stream?id=” (do not include the the URL.) e.g. you may see: http://log.brewfather.net/stream?id=q4F3wPfooBa3X3, from which you will enter q4F3wPfooBa3X3 as your key.
- Push Frequency:
- Enter the push frequency in minutes. Brewfather requires that you push readings no more than once every 15 minutes. Valid settings for this field are 15 to 120 minutes.
ThingSpeak Settings
ThingSpeak allows posting custom data streams in order to collect and report upon it. To enable this functionality, you must create a channel with the following:
- Name (optional): Any you prefer, such as “Brew Bubbles | Fermenter 1”
- Description (optional): How you would like to present this, such as “Brew Bubbles data channel for Fermenter 1.”
- Field 1: “BPM” and check enabled
- Field 2: “Ambient °F” (or “Ambient °C”) and check the box to enable
- Field 3: “Vessel °F” (or “Vessel °C”) and check the box to enable
- Link to External Site (optional): https://www.brewbubbles.com
- Link to GitHub (optional): https://github.com/lbussy/brew-bubbles/
After you create your channel, you may optionally go into “Sharing” and allow people to view your channel. The public URL may be discovered by selecting the “Public View” tab.
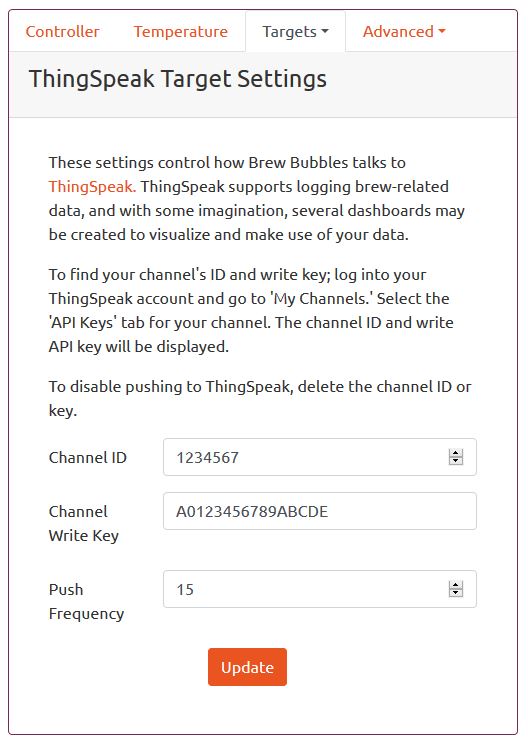
- Channel ID:
- Go to ‘My Channels.’ Select the ‘API Keys’ tab for your channel. The channel ID and write API key will be displayed. The Channel ID is a number towards the top in bolded characters.
- Channel Write Key:
- Go to ‘My Channels.’ Select the ‘API Keys’ tab for your channel. The channel ID and write API key will be displayed. You must use the “Write” key, the “Read” key will not allow posting data. If you ever wish to generate a new write API key, you must re-enter it into Brew Bubbles or else posting will fail.
- Push Frequency:
- Enter the push frequency in minutes. Users of a free account are limited to sending no more than 3 million messages each year to the ThingSpeak service. This works out to approximately 5 posts per minute. Users of the free license will also be limited to 4 channels. Since Brew Bubbles only allows you to send once per minute, and ThingSpeak limits you to four free channels, you are unlikely to find a way to exceed your quota.